Category Archives: Foundations Series

Line


IMG_2400Hello,

I mentioned at the last post that I had selected my word for this year and it was line.  I have been thinking about that on my walks this week and I have compiled a list of over ninety ideas that are connected with that word.    IMG_2401 Then I sub divided the line types into categories and I will write about the different types for a few weeks.   I will start with line in relationship to  art.

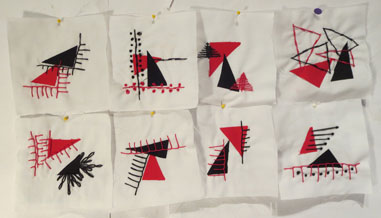
When I was teaching I would have my sixth graders do a line exercise where they would first draw one line from the left side to the right that changed direction somewhat but did not cross itself.  Then they were asked to change the color they were using and add a IMG_2402second line parallel to the first that was of a different type.  It could be  a wavy line , or a loopy line  or a thick line,  or a thin line,  or a dotted line, or a broken line, or a sharp line, or a zig-zag line, or a blurred line, or one that expanded and contracted.   I am sure I gave them lots of choices and they would keep building until the page was full.  The results  were always successful and beautiful.  IMG_2403    It was a good way to introduce the concept to them.    But there are more ways that line is apart of art then just types.    There are all the lines that are a special part of perspective  for example.    Like sight lines, ruled lines, horizon lines, vanishing lines, diverging lines,  and vertical lines.  There are also lines that are just part of the IMG_2404objects in the pictures like roof lines, and tree lines and power lines.      Lines are so powerful in art.  They are everywhere.   Lines can be found  in the art  and are created  with  the materials that we use : like drawn lines,  sketched lines,  paint lines, drip lines, scratched lines, texture lines , shading lines, connecting lines, out lines, shadow lines, crease lines  and edge lines.    This topic will require more study.

IMG_2413 
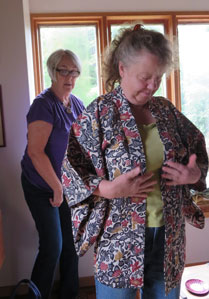
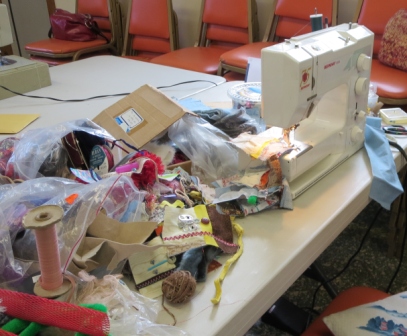
This week QuEG’s meant and everyone had stuff to show.  Sally has been busy  with embroidery machine and she made these lovely place matts using a patriotic theme.  She also did a bit of Valentine work for her grand daughters.IMG_2414

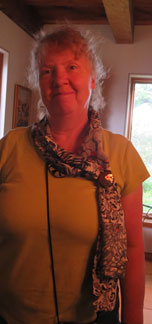
This card has a thread constructed heart that can be removed and worn as a necklace.  I think it is wonderful and so delicate.  I have learned to really appreciate  her great work – it is always so very lovely.IMG_2415

IMG_2420
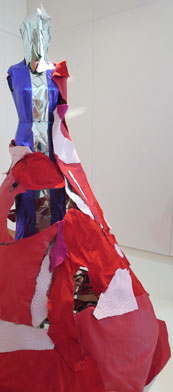
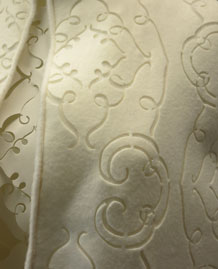
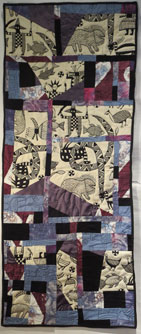
Barb is working away on her cut away project.  She is also doing free motion machine work for the quilting portion of this one.

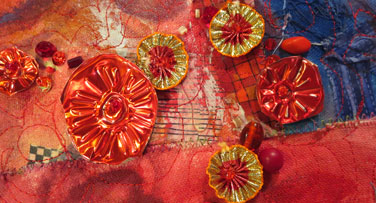
Liz had two Valentine related projects for us to look at. The first is this wonderful “cookie” pin.  I may just have to keep this idea in mind for next year.   IMG_2418

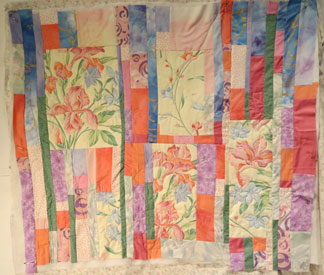
Her second work is a combination of red work embroidery and  piecing.IMG_2421   The embroidery was done by Jean Tracy and Liz did the boarders.  A great bit of team work.   It just makes me smile!

IMG_2429
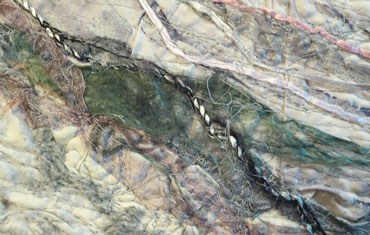
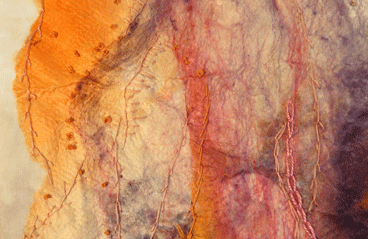
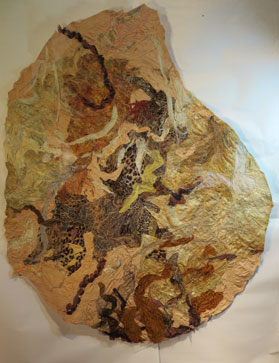
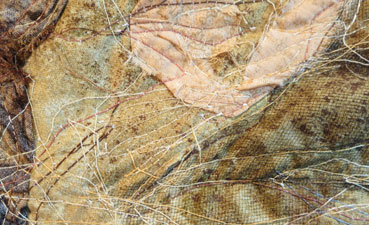
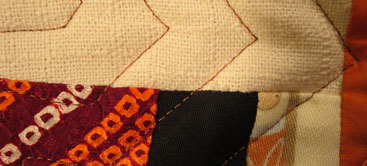
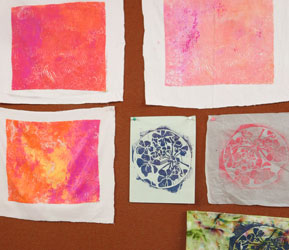
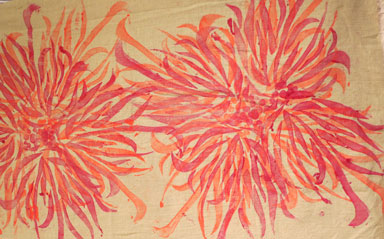
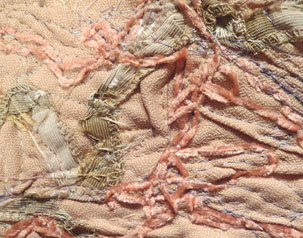
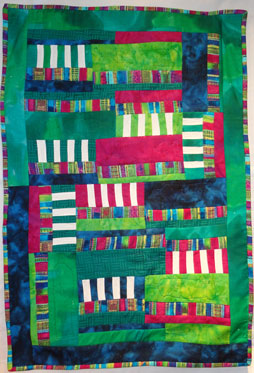
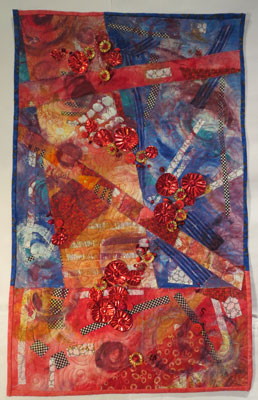
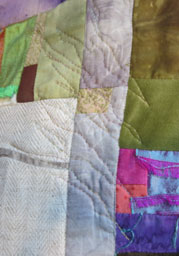
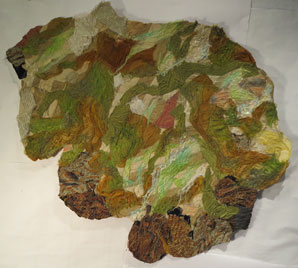
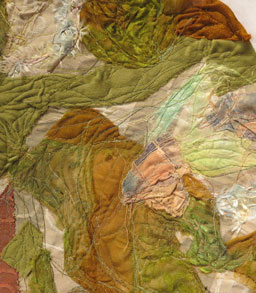
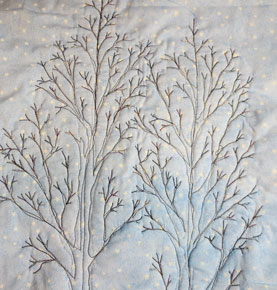
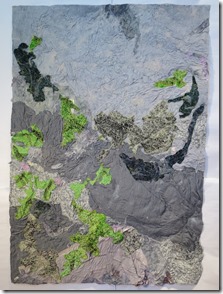
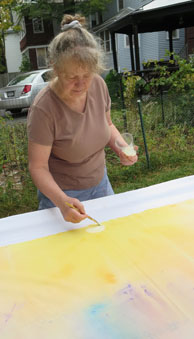
Progress Report:   Dry Falls Lichens     This quilt is based on a portion of a photo I took on a trip with Marty to see the Dry Falls National Monument in Washington State.         I just  loved the high contrast between the lichens and the rock. IMG_2432

IMG_2433   Some of the lichens were dead and they had returned to a gray color,  but retained there textures.   There were bright orangeIMG_2435 lichens on this same rock- but they were too much for this piece.    There were some dark blue gray lichens too .  It was fascinating to me.

IMG_2427 
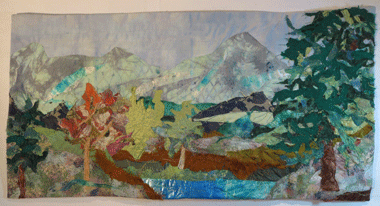
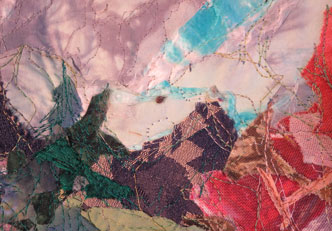
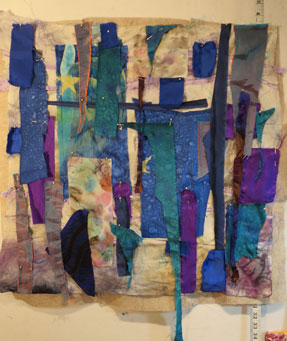
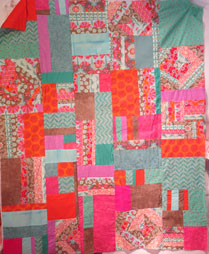
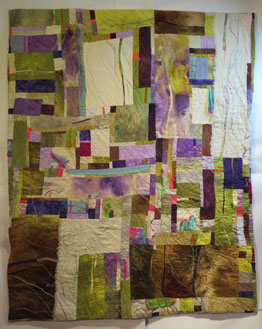
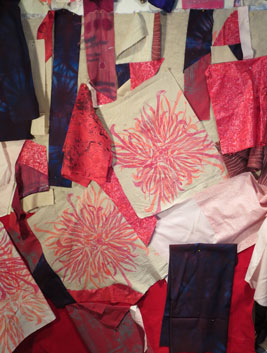
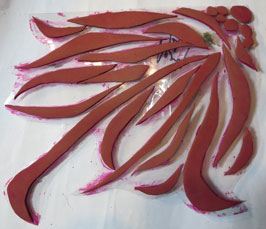
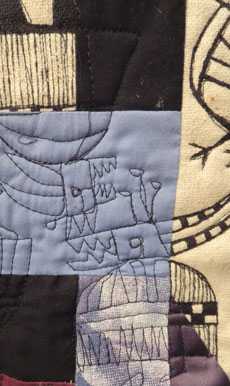
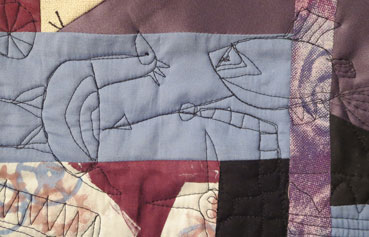
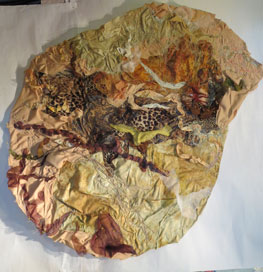
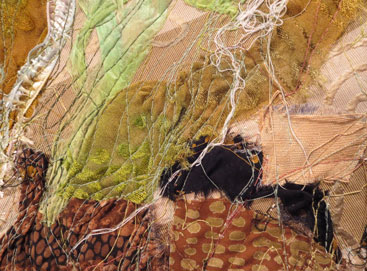
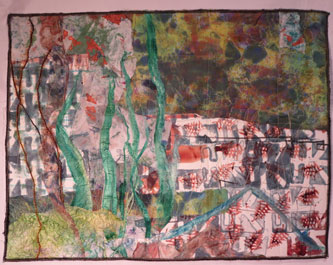
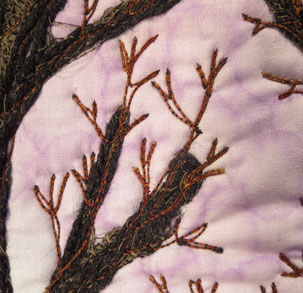
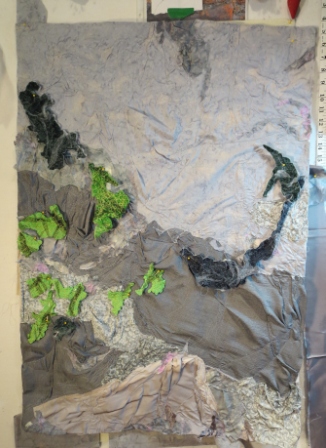
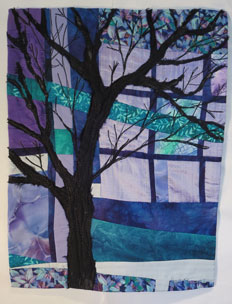
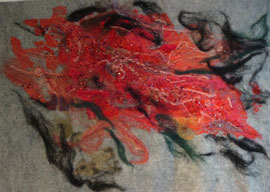
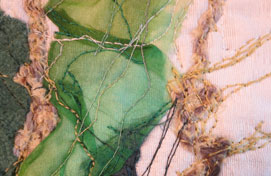
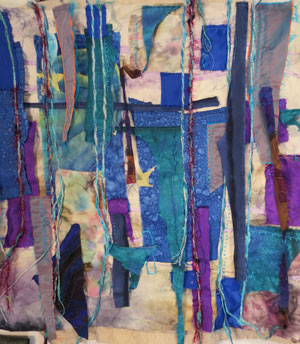
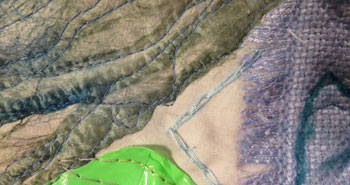
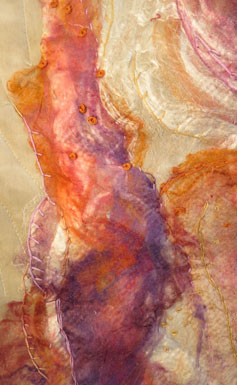
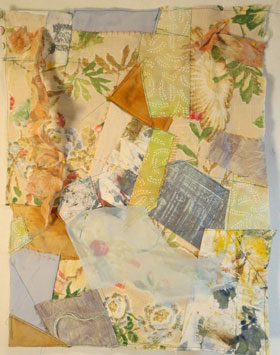
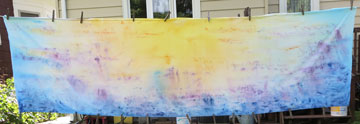
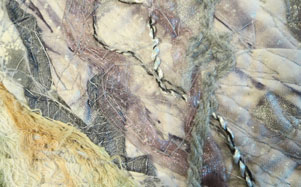
No title for this work yet.  I thought I was creating a background for a stump that I created last week with Cris- but I do not think this works to support that idea any more.  It will just need to be studied  for a bit.

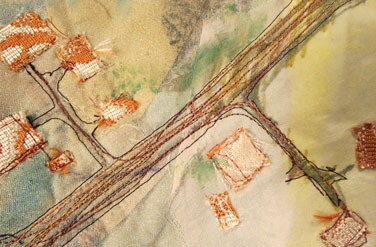
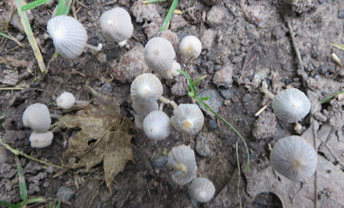
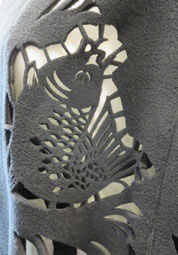
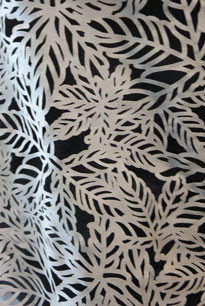
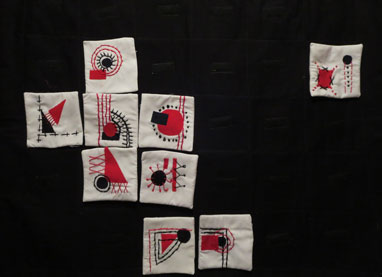
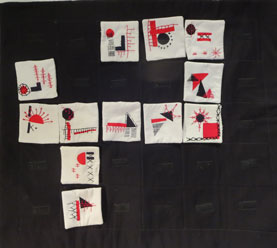
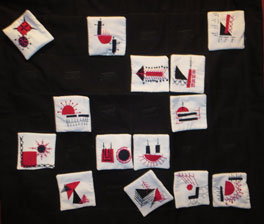
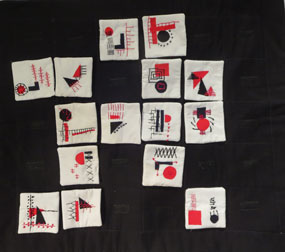
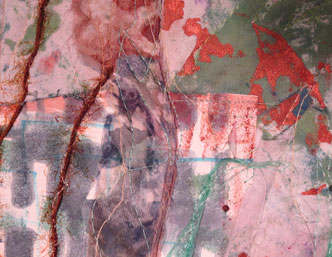
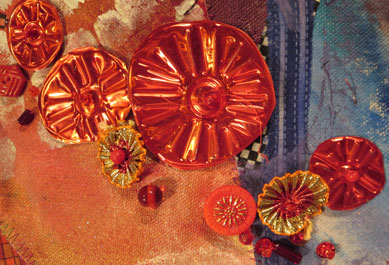
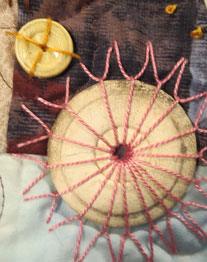
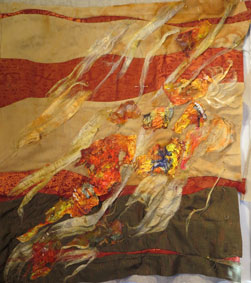
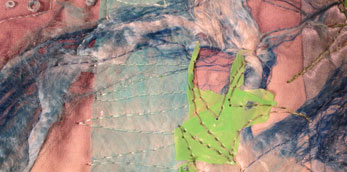
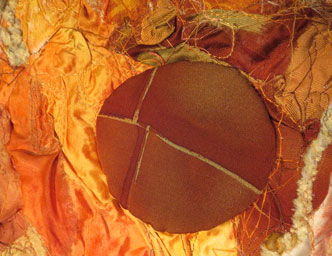
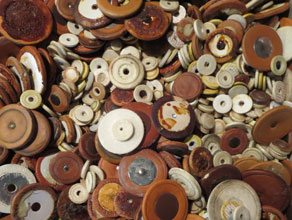
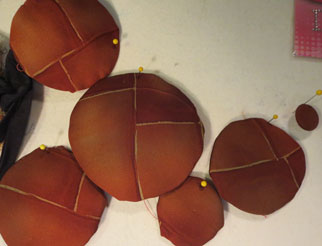
Nail Casings   I picked up the white plastic cast off holders from a nail gun while I was out on a walk earlier this fall.   They have been pinned to the bulletin IMG_2426board for a while and finally I started to embroider them down.     ( the very light areas on this image are from the sun shine coming into the studio  this morning)

IMG_2425 
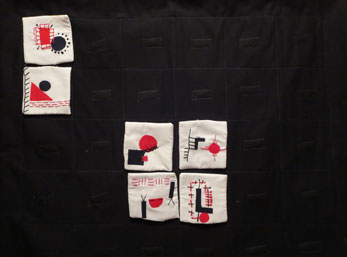
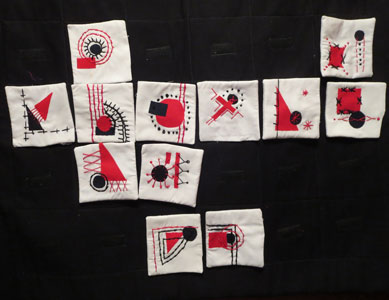
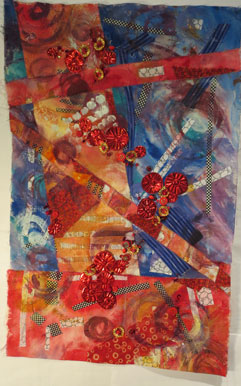
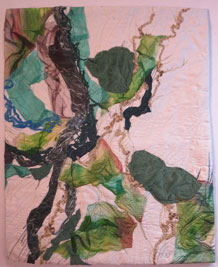
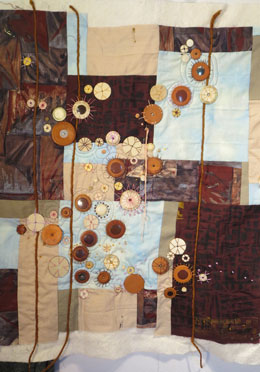
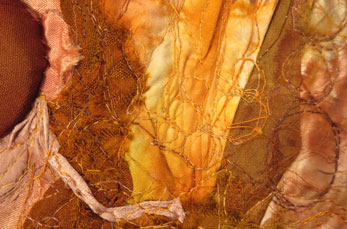
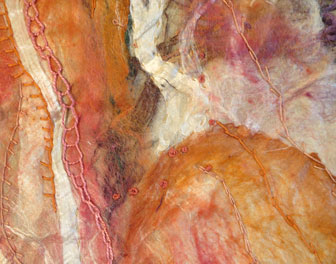
Circuits  I have been adding chain stitches and  beads to this work for a while.   It is developing in a nice fashion.  I am enjoying the way  it is growing without having a real strong plan in mind.
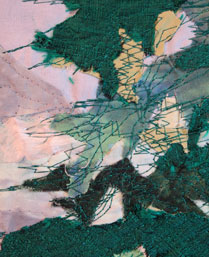
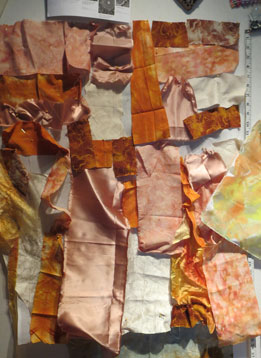
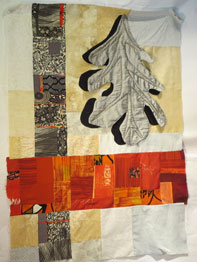
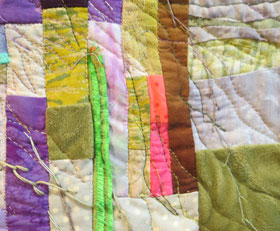
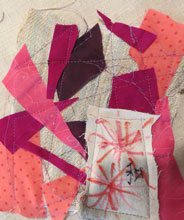
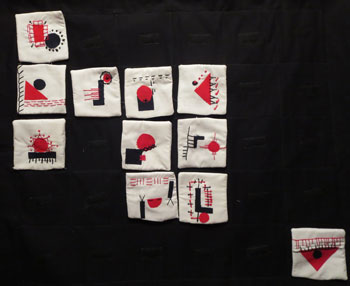
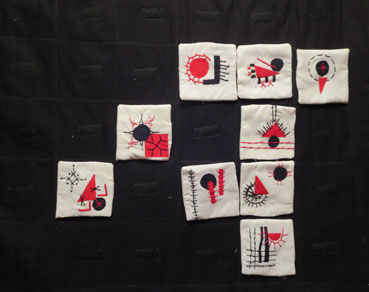
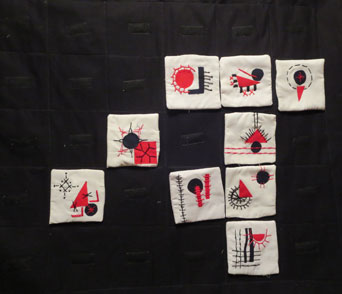
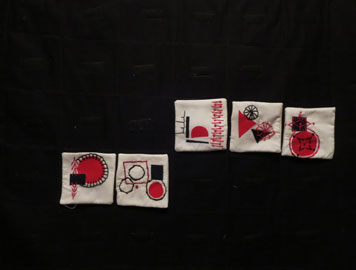
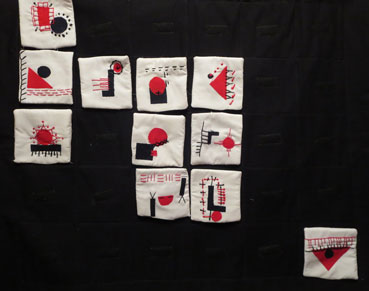
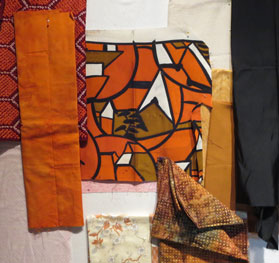
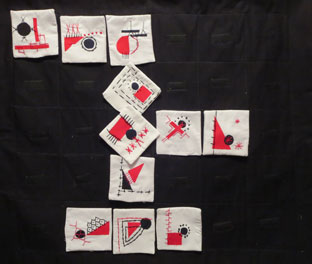
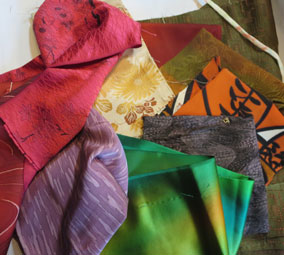
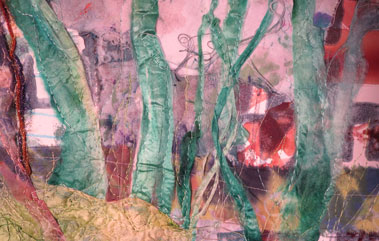
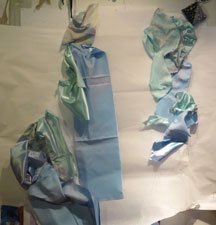
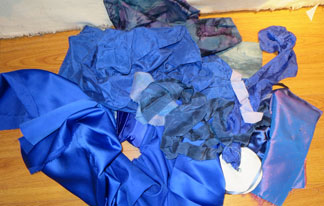
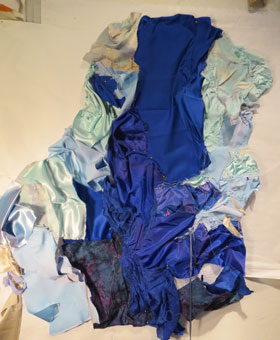
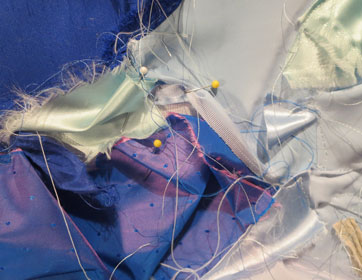
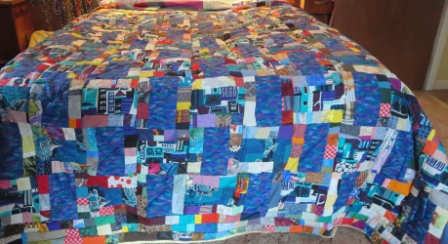
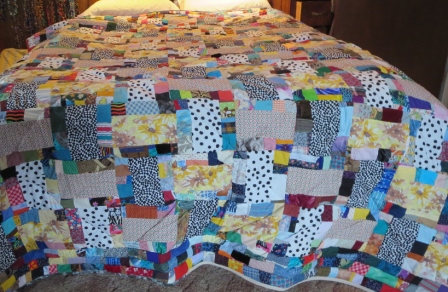
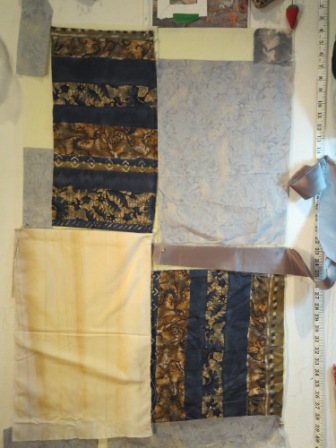
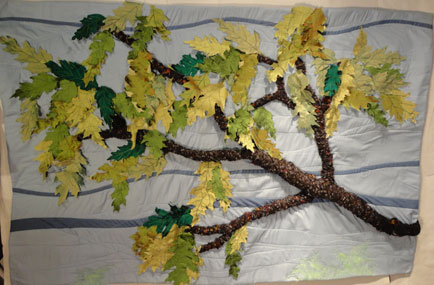
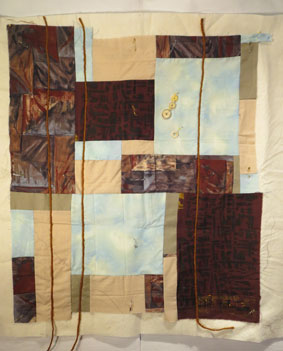
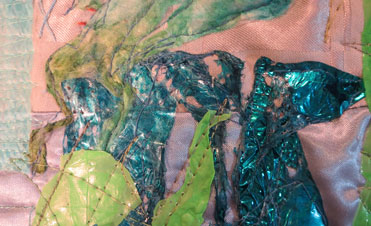
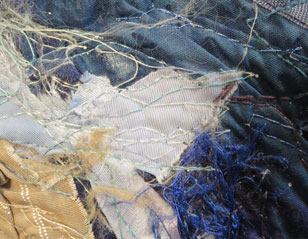
New Work  I am reallyIMG_2423 playing with this piece.  I  started pulling fabric that I though worked together and just started laying in down and stitching it together.   It is fun and I may just cut it up when it is done, because I need some small works for the 6″x 6″ challenge.   Time will tell.

Keep Creating

Carol

Active

Machine and clutterHello,

This week as been a full one.  I went to play day /work shops sort of things two day this week.  I printed with shaving cream at Turquoise street studio and now have a new pile of fabric to play with.  Then I went off to Marla a Figerative Art event were we all worked for the day on our own projects.  This shot is of the clutter on my table were I worked on my Creative Assistants all day long.    Marla showed these wonderful doll heads at lunch that day.  She will be  teaching her water color painting  techniques at Artist Doll and Teddy Bear Convention in Philly   at the end of April.   Check our her blog at : orsinisangels.blogspot.com      Its wonderful!     I am still struggling with the  new program so I do not have all the images I want to share but I have some.    I thought I

Caramelized  26" X 33" $300.00
Caramelized
26″ X 33″
$300.00

had it conquered yesterday- but the new things I wanted to add this morning are not going anywhere.   I will keep at it.

Progress Report:  Caramelized    I enjoyed working on this project.  I really used lots of different materializes on this one.  There is fused silk paper of course. Some fabric that I printed last year.  Close up #2   The light  orange pattern on the rust fabric shown here  with the gold silk on top.    I like the silk screen I used here so much I used it again this week in blues on a turquoise  background.


Close up # 1??? The last technique  is   some painted tyveck that I placed between two sheets of parchment paper and melted with a hot iron.    I like how one   is never sure how it will melt and bubble.     There is also a little of silk Komona  that I got from Ginny in this work.


Scarp Happy 1???????????????????????????????

Way back in early  December  my big  sewing machine was out for repair.  So I got out Grandmother  Butter’s Feather weight.  With that I sewed up all my scarps and now I am  putting them together.   I use a sort of Roman strip for my block ( look in the tutorials to see the full process)  This one with the blue centers if the first.

 Scrap Happy 2 Scrap Happy #2 for  2015

This one with black and white patterned centers alternating with yellow and cream is the second.  I am working on the  next three using different colored centers and they will appear as I finish them.


Dry Falls LichensDry Falls Lichens I am to the fun part of this work now.  I am adding the lichens .  They are created by layering felt on the bottom with velvet on top and then a layer of nylon net on top of that.  With this sandwich pinned together I free motion circular patterns on top of all of it to bind it together.  I really enjoy doing this  step.

 New workNEW WORK  I made this simple layout for yet another bit of hand work.  I found some wonderful plastic shapes that I want to add to the surface by hand so this will serve as my base.

Keep Creating and I will keep struggling with the program.

Carol


Realisations

Out of the Dark closeup 1Hello,

I feel so Positive when I think about my work.  I did a solo trunk show yesterday for the North Syracuse Art Guild titled

Out the Window  16.5" X 21.5" $125.00
Out the Window
16.5″ X 21.5″
$125.00

” Your Art /My Art”.  In that lecture/ trunks show,  I compared my work to the many styles and types of work that the members use.  In doing so I really realized how much I draw from the other  art categories to get my ideas across.  I draw  directly on the fabric with pencils, crayons and markers.  I use my machine as a drawing tool too.  I  New-IrisPaint  with acrylic,water color and dye on the surface when I need to create a special effect.   I print on the surface using  silk screens, stamping and stencils to get images I want on the work.POMEGRANATEcl4  I use some weaving techniques like felting, silk papers and frapping.    I often use collage techniques to build up my surfaces with

Red Nebula  18" X 24"
Red Nebula
18″ X 24″

textures and transparencies and different already textured fabrics like velvet and satins.    I even embellish with old jewelry on occasion.   I am thankful that I get to use from all the different art areas to full fill my creative drive. I realized too that I have been using my experiences and interests to fuel my work for most of my life.   Doing a presentation like this is a good way to reflect and re evaluate oneself.

Oak Leaves 45" X 30" $ 350.00
Oak Leaves
45″ X 30″
$ 350.00


I now have the monster job of returning all the work back into the category packs that I store them in.     I feel so very thankful that I am working in so many ways to fulfill my creative ideas.


Acanthite: Foundations XXIV 18" X 23" $ 150.00
Acanthite: Foundations XXIV
18″ X 23″
$ 150.00

Progress Report: Acanthite :Foundation 24    This quilt is  went together very quickly for me.    This stone added some problems as some of the areas where a sold white.    I wanted to be sure to use velvet and now whale corduroy  on this work to show the wonderful textures they  add to the surface.  There were also lots of  cracks on the surface that added interest to this one.    -Acanthite-cl2


This shot also shows some of the chenille yarn( dark green) and some silk paper( blue- near the top).

Acanthite-cl3


 Broadcasting    I am enjoying doing the hand work on this piece.  Most of the saxaphone Broadcasting full pads are stitched down now and I am adding  beads and french knots to the surface.   I have added some reflective quilting to the surface too.    This work is going along well at the Broadcasting detailmoment with each actions leading to the next.


YellowstoneYellowstone    The ease that Broadcasting  is a great contrast with my slow process on this work.  I think I finally have the map portions the correct size and location.   I will do the paint step for that and then I will move forward.  I also realized that the piece is too pale.  Yellowstone has lots of forest and I want to project that feel too so I pulled out dark green organza ( pinned to the left) and adding that will help me go forward I hope.


The Blues   This work The Blues just needs time as the hand work is a slow thing.   I am playing with three of different types of stitches-  the chain stitch,  the blanket stitch and the  fly stitch.  I am varying the size of the stitches  to add interest.


CarmelizedCaramelized    This is a new work that is still in the shifting and  pinning stage.    I melted  the Tyvec that I painted in the fall colors last week, with the iron between sheets of parchment paper.  The melt results are so much fun because they  are uncontrollable.     Mixing them with silk paper makes me think of carmel  and melting butter.  That is were the title came from.     I am enjoying the play.

Keep Creating

Carol

More Fall Stuff

Creatie-Assistants  Hello-

Fall is still all around and painting the landscape here with color.   I love it.

When football season starts, I watch and spend my time making  my Creative Assistants.   This is the  first batch of 49 that I have completed.  I so enjoy the process and it does make the football go by faster for me.   It seems the games have lots of time when there is nothing  much going on- but commercials, so I stitch away.BO29-QBL2    I  enjoy giving them away when I go to Quilting by the Lake every summer.   ( there is a tutorial on how to construct your own Creative Assistants below)

I am taking a class called Deconstructed  Screen printing with Kerr Grabowski. It starts today and lasting for three days.  This is my pile of stuff for the class.  I am sure I will come home with lots of  new altered fabric to use.


Spill 17" X30" $185
Spill
17″ X30″
$185

Progress  Report: Spill  I had a good time working on this piece.   I so love texture and this one has lots of different materials that add to that.   There is the usual cotton of course, and my current  favorite – silk paper then I added iron melted plastic bags and  turquoise mylar as well as satin, and course woven silk.  I added hand stitching t in the form of french knots, button whole stitches and chain stitches to the surface as well as machine drawing too.   I  am pleased with the results.

Spill-cl3This piece BO29Spill-cl1fits very nicely in a little nook in the wall.


Spill-cl3


Watermarked Sandstone 33.5" X 25" $305.00
Watermarked Sandstone
33.5″ X 25″
$305.00

Watermarked Sandstone- Foundations XXIII     I am finally finished with this newest  member ofwatermarked-sandstone-c BO29Watermarked-Sandstonew-the foundations series.  I really enjoyed the free motion work on this project.  I had a good time doing the painting on the surface of this piece.  Adding the iron nodes to the surface was a bit of a challenge as  I tried them in many different locations before I finally selected this layout.  Then when I was shooting the work Watermarked-cl3for this entry I discovered that I like it on a 90 degree  turn from the direction that I had been looking all the time I was working on the construction.   One always needs to be open and aware of what is in front of them.

New-workNew Work    As I was nearing the end of my work on  Spill I realized I needed a new piece to do hand work on so I looked  through my sketchbook of ideas.  I came across this old idea of using circles  and lines for a piece and though I would try it. I have a box full of old Saxaphone keypads that a friend had passed to me and I thought this would be my BO29padsopportunity to use them to express this idea.    There are so many different sizes, colors and textures here- I am sure I will have fun with this work.

I hope all   enjoy the colors of the season and the kids all dressed up for Halloween.

Keep Creating

Carol


Quality

leaves2 Hello,

Leaves continue to be a big part of  my daily dose of nature.  But I want to talk about a Jewish Proverb I came across in my reading this week.        “The Quality of life is fuelled by our productive wealth.”   That idea has been on my mind while I have been walking for the last two days.  To begin with I really think that my life is a rich and wealthy one,  but I think even though I am productive that is not the only thing that adds meaning and value to my life.   Quality  is strongly related to context.   One can have “Quality Time” and for me that can mean just

Costumetime spent listening and interacting with a friend or child.  A big part of that quality comes with the  focus of that time- no distractions or concerns for other things.  When I was making the halloween costume for my grandson- (some video game character that I do not know anything about)- that” one on one time ” with him telling me exactly what he wanted and helping with the sewing machine work was real quality time.   I spent quality time talking with Nancy's-quiltNancy on Wed at the FAB meeting when there were only the two us and we got to telling stories about our youth to one another.  That shows a quality of trust too.  (She is making progress on her quilt and the sky with the clouds she made in silk paper on that sky is great.   ) Then there is also  quality friendships like the one I share with Nancy and a few others.   There is a degree of necessary quality in all our lives for things  like  shelter, food,  good quality air and water- without those assuredness none of the other quality things can come about.   We need those quality ingredients  to be  healthy and to fully appreciate the degrees of wealthy  excellence our lives hold.

Agate 23" X 36"   $300.00
Agate
23″ X 36″
$300.00

Progress Report:Agate  I finished this work this week.   It has been created from a big piece of silk paper  that I made with Ethel a few weeks ago.  The most difficult part of this project was deciding what side of the  silk paper to use- they were both so lovely.   I had a good time attaching the silk paper to the quilt with  many hand stitches.    This project was created with silk hankies that were hand dyed before I put the paper together.  I might not have selected these colors to use together on my own, but I sure like them and  will try to add this type of mix to my own way of thinking.BO23Agate-cl1 BO23AgateCl2


 BO23Agate-cl3


SpillSpill   This quilt is coming along nicely now.  I love all the textures on the surface of this work. This shot shows silk paper- two types the sheet form (on the far left) and the flow form(the green blue at the top) , the iron melted  mylar( the turquoise ) and iron melted plastic bag( the apple green).   The whole thing has been fun for me.

Watermarked Sandstone  watermarked-Sandstone I am still doing machine drawing on this work but I can see the end is in sight.    Again I am playing with texture- my favorite thing.   There are “nodes of iron ore” in the image and so I have created some solid rust colored circles to add to the surface of the piece.   Before I can stitch them down I need to add rust colored paint to the surface to show how the water wears away the iron too Iron-Nodulesand in so doing it stains the surrounding stone.


Yellowstone Memory Map   Mapmemories-Yellowstone  I so enjoyed creating the Sandstone Church project that I thought I would do a second memory map type quilt from my childhood.  When I was seven, my Dad was a summer ranger in Yellowstone National Park at South Gate.  I have wonderful memories of that summer and want to try to  put them into this  new project.     This is layer one and it too is ready for a paint layer  to soften and unify some of these  parts.

I hope you too are enjoying the fall color and creating fun works.

Hugs

Carol


Eliminiated

Hello,

I want to talk about being Oak-Leaveseliminated from a judged show.  I have entered three this fall and of the five quilts I entered and paid fees for, none was accepted for the  shows.  One never knows the” why “of such rejections.  Even  having been a” holder” for Scholastic art compactions and being  in the same room as the Judges- I sometimes could not understand that “Why” question.   Judges are people with tastes and biases of their own.   One time  I did hear one judge say” I never accept any art with a skelton in it.”  Sense I as a teacher, had used a skelton from the science room as part of a still life with my own students, I  felt that sure was an unfair feeling for a judge to carry.  But they are  people – not gods even though they are given lots of power.     Perhaps the  work did not go with the others selected.  Or maybe the judge did not like the design or color combinations.  The artist never knows those things.    My Father often said” It’s not so much what happens to you, as what you THINK about what happens to you that makes the difference.”   With that in mind, the whole experience becomes one of choice.   I could be angry , hurt and sad by these developments,  but I choose not be be.    I still feel my work is good and I am proud of what I do.  I

BO16Nancy-Paintingenjoy the process and that is the important part for me.  It would be nice to have someone- a judge confirm my feelings- but that is not the case at this time.   Lastly, I am  the  one who chooses to enter the competitions.    I will let time heal over the feelings and try another competition that may fit what I do a little better next time.

I spent a couple of days working with Nancy on her sky again.    She is becoming quite a good painter with a sponge.  She built up more clouds and the work has some BO16Nancy's-sky-fabricreal depth now.   I think that we are done with this step and the quilting will add even more demention to the final.  I am so proud of all the chances she takes with her work.

Asurite  Foundations XX  34" X 44"  $1100.00
Asurite Foundations XX
34″ X 44″
$1100.00

Progress Report:  Asurite Foundation XX    This quilt was finished in June, but I have not posted it because it was an entry for BO16-Asurite-cl3one of the shows I mentioned above .   One of the limitations on entry to this show was that the work was not to be shown publicly before .     This quilt was lots of fun to work on and I am quite happy with it even all these mouths later.    I added lots of metallic fabric in this work as well as many silks and satins.

BO16Asureite-cl2 I used some fancy yarns and threads in this work as well.  I find that when I pickup the actual rock that I used as inspiration- I see more possibilities  for additional pieces .   Only time will tell.


Whipshock Hill

Whipshock Hill Foundations XXI 44" X 35"
Whipshock Hill Foundations XXI
44″ X 35″

Foundations XXI    This is a second quilt that was part of the same entry mentioned above.  I finished this work in June.  It is based on a cut in the road along Route 279 nine miles west of bennington  Vermont BO16-Whishock-cl3
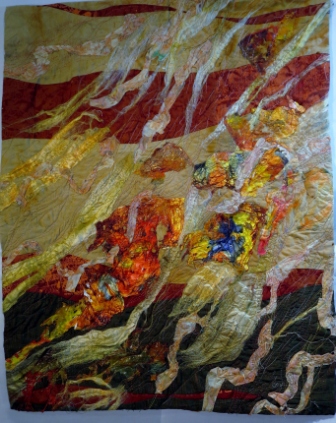
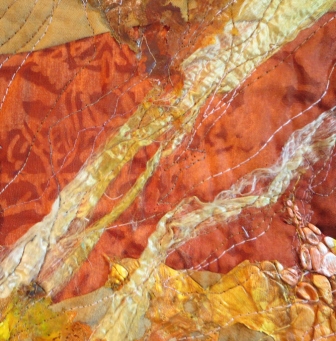
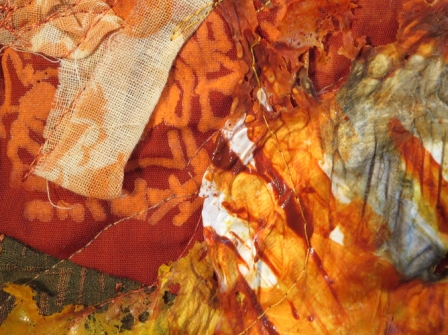
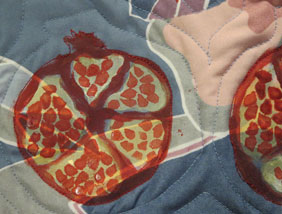
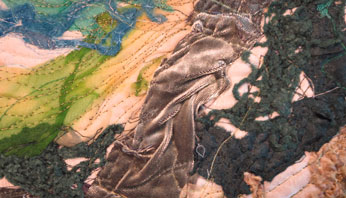
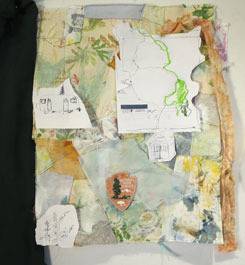
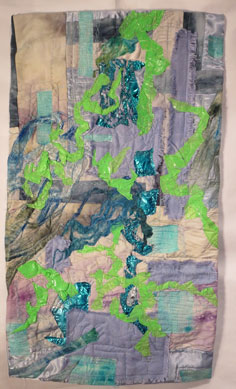
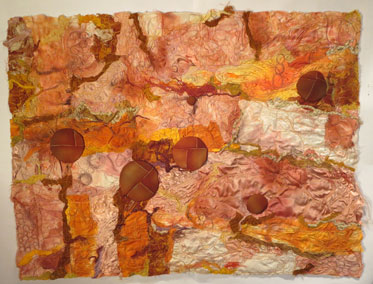
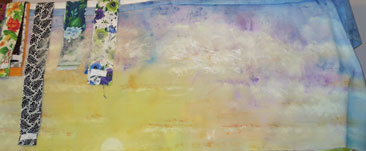
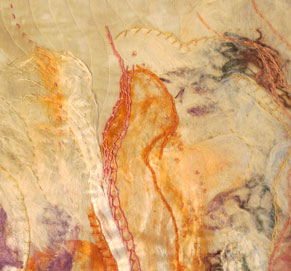
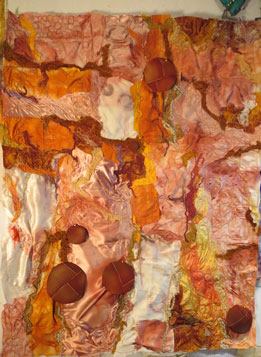
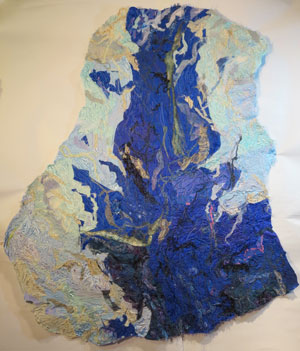
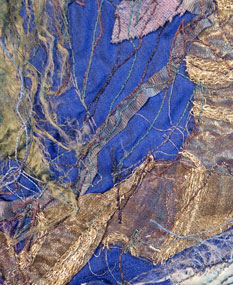
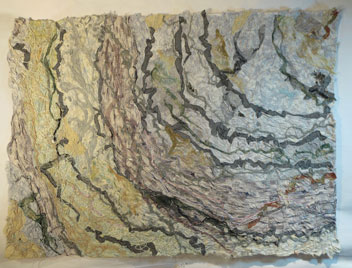
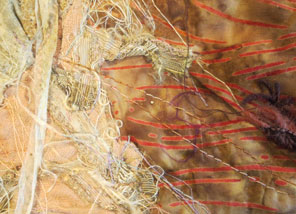
.    In actually it is about  500 yards long and a very humbling sight. I added lots of yarns and ribbons to the surface of the quilt as there were lots of little fractures and lines of thin deposited BO16Whipshock-cl2color changes in this rock face.     There is also some silk paper in this work.


Alpine Lake 28" X 14" $145.00
Alpine Lake
28″ X 14″
$145.00

Alpine Lake 

This is a new technique that  I am developing that is aBo16Alpine-Lake-Cl3 very college like approach to quilting.  I am continuing to think more in the way of color for the solutions then the type of fabric I am using.  I even used an old bit of a paper quilt BO16Alpine-Lake-cl2that was the correct color and texture for the water in this work.   I used some double knit on this one  as well as silk, silk paper, organza and cotton  fabrics.    I even did a little free motion zig zag work to add more texture to the tree.   I need more practice to get that under control.

Agate    I am still adding hand work to this felted work to add texture to the surface. Agate  I may have given up doing Daily’s , but I still am doing lots of hand work.


Watermarked-sandstoneWaterMarked Sandstone   I started this  new Foundations Piece earlier this week.   This one is loosely based on an old black and white  photographic of sandstone that has watermarke erosion on it.  I know the typical colors of sandstone so I am trying to stay in that limited range with this first step.     I really love the texture and I am having fun planning ways to show it in this work.

New work  BO16-new-work This is a pure play piece.  I am not at all sure what I am doing and have no clear idea where I am going with this.  The scarps had just been in the bottom of one of my baskets and I thought they looked  good together……    Quilting, crumpling and following the directions of the work may or may not help this.   But I am willing to give it a bit of time and freedom to see what happens.     Giving myself permission to mess up is very freeing!

I like to hear feedback,  post a comment.

Keep your eyes open to the wonders of the season.

Carol

Paying Attention

BS11Cemetary Hello,

When one needs ideas for solutions  or inspiration I believe  one has some  choices.         I was struggling with part of the  Stone Church project.     There is a old cemetery that is a part of that area and I wanted to include it in my piece.  But I was having trouble  so I took a walk in the near by cemetery to refresh my mind.  I was surprised by the presence of the deer.  There  were two actually and the cemetery  is surrounded by city on all four sides.   Looking at  how compact these stones and how much they overlapped has helpedVictoria's-project1 me formulate a solution to the  work I must do on the project.

Sometimes the ideas are as much about paying attention as anything else.     There was a FAB meeting at my house this week.  Folks showed their work and  Victoria is moving along nicely with this quilt.  She got inspired by Ginny’s silks that she had purchased a few weeks ago.  They  are shown here in the orange and  gray strip. ( I got inspired by that same orange silk)    I Vickie's-bed-fullthink the shadow of the leaf looks wonderful too.   She  also showed a top that she had assembled for a bed quilt that she is making for her new house.    I am so impressed by the large number of prints she uses and the colors.    I would not have put that strong orange with the turquoise myself- but I love the combination.   So by paying attention to this  little surprise I now have  a jumping off  color  combination  to try in the future.   The real trick here is to note the surprises and in my case write them down.  I do that in my idea journal and it helps me when I need to get going with a new piece.

Progress Report:

Foundations XXI  Elsies Stone - Cape Cod Rock 43" X 44" $595.00
Foundations XXI Elsies Stone – Cape Cod Rock
43″ X 44″
$595.00

Foundations XXI Elsie’s Stone- Cape Cod Rock   The Road Less Traveled

I am finally done with this project.  I love all the texture on the surface of this wonderful stone.  I am very grateful that Elsie gave me this parting gift.     The many fascists of its surface with the limited colors make it fascinating to me.   I think I could revisit this rock and work from a different side  too.

I used yarn ,  nylon nettingClose up -Elsie's-St and lots of torn fabric bits to produce the colors and textures.    There is also my favorite silk paper at work on this piece.


Elsies Stone-cl2


The Road Less Traveled  35" X 45"  $535.00
The Road Less Traveled
35″ X 45″
$535.00

 The Road Less Traveled

  I started this quilt in Rosalie Daces Color class at QBL.  I have finally completed the process.      I used many of the techniques she taught us.  I did insert slender curved lines into sections.  I let colors “bleed” or flow  across seam lines to make connections.  I used raw edges to add texture  and I hand embroidered across parts of the surface to draw sections together.      Even Close up -road-less-traveledusing all thoughts techniques  I did not use all the techniques that she taught us.  As a teacher she has a lot to share and she does so very willingly.

I enjoyed using these

BS11Road-LT-clearthtones and I will continue to  pursue the techniques she taught.  I am still not happy with size of my slender inerts- so there is work  to do there.


Stone-Church clStone Church

I already mentioned the bit with the cemetary so I will not cover that again.  I added lots of machine lines on the roads as they were gravel and I remember how there seemed to be lots of “tracks” of the tries on them.   I remember too that Grandmother Ester liked to drive down the middle and only pulled the turquoise ford  over when she could see a car coming toward her.

Harmony     I am done with the assembly of the form of this quilt.  I decided to use the character that

Harmony cl represents Harmony for the central focus and so far I have just quilted around that shape to create the quilting pattern.   I want to fill in the character with black hand stitches/ patterns so it stand out.   But I have not come up with the correct stitch to do that job yet.   So I keep looking in books and paying attention to the world around me and hope that I will find inspiration.  Until then  the project will just hang in the studio awaiting the correct solution.

BS11Sketch-for-CNew Work      In Valeri’s Goodwins class she had a do a fabric ” sketches” of 4″ X 6″ before we started work.   So in keeping with using the best the teachers have to offer I made the sketch first.  This is the one I selected as my jumping off place.    I wanted to use the big printed flower I created a few weeks ago as a big part of this work.  NowBS11Crumasnthum I am in the process of pinning up parts that I think will work to do the job.  I have split the two flowers apart and added parts of a third to the design.  Very few parts are  connected or solid in its position at this point .  This is  fun but scary part of the process-  but I need the challenge.


 Daily News    This project is finally complete.  I have now Daily6sewn all the blocks closed and will continue to play with placement  for as long as the process interests me.   This will be the last post where the  project will appear because at this point all the finished units have been appeared at  least twice and some more times then that.   Daily-5I have enjoyed doing a daily sewing pieces and it is very true that the whole is made of of lots of little parts.  If I had started out with the intention of making  180  hand embroidered  blocks I do not think I would have done it.  But by making small manageable  units- it as a doable Daily-4task.    I have been encouraged by Susan to submit this idea as an airticle for Quilting Arts so that is my next project.

Keep Creating

Carol1Daily3


Daily1

Daily2

Abundance August 28, 2014

Blackeyed-SusansHello,

Today on my walk I was struck by the effects of sunshine and light.    It was not sunny today by I noticed how bright the Black Eyed Susan’s were at the entrance toMushrooms the condo complex down the road where there is full  sun shine.  By contrast the  there is so much shade in my yard that there are mushrooms growing along the drive on the north side of my house.  Granted they are quite small- only a out the size of a young child’s finger tip- but growing there none the less.   Sunshine never falls on this area of my yard, but Nature still  finds a way to put life into the space.  I am so lucky to live in such an abundant part of the world.   To add to the abundance of my visual world there is an  abundance of activities going on too.


prints Last week I spent three days exploring with Cheri and Terney printing techniques.  We started out intending to do wood cuts and we all did one, but soon found out that although the look is wonderful, the process does not allow for much cross grain cutting.    I think now that our tools needed a bit of sharpening  because we all became quite tired of all the effort necessary to do the work.   Cherri Cherri was the most successful and her’s are  the two  round ones on the pin wall.  Treney had never done Gelli prints before and the other prints   on the pin wall are her works in that area.     I decided to make  foam prints and got going creating graffiti stamps of everyone’s name.   I wrote the names out with a paint brush so I would have a flowing design and  then did a second copy on the paper side of the sticky fun foam.   I then carefully cut out the Grafittigraffiti with an exacto knife so I would have a positive and a negative copy of the works.    This picture shows Cherri’s name.   The black is the foam and it appears backward so when it is printed it will be forward.  The red graffiti of her name is a back view and it still has the paper on it.     Tierney printed her name on the Gelli plate fabric she created the first day.     I have not cut out my name yet because I made it too big for any of the Tierney-Grffitticlear plastic  that I mount these on.  I will have to save my take home container from Wegman’s salad Terney to accommodate them. We had a good time   working talking and laughing.  It is always more fun to explore with other folks. Prints-wood and foam

I made one last stamp  on Friday and printed it when I got home.  Last week when FAB went to Genny’s she had a wonderful kimona on the wall and I could not get the flower  image out of my head.  So I designed and created my own curcumthum. BA28stamp  I made one fourth of the blossom and then rotated it as I printed.  I did a second color on top just off center a little.  I look forward now to using that fabric in the near furture. Print  I found out that I really like the flexibility and speed of foam stamping too.


Then on Tue this week I went to the Kuhlman Foundation opening at Cornell University.     Seven BA28Foundatin-dress-2scholarships are given to students with a theme that they need to interpert.  This year the theme was Layers of Leather.     The approaches were all different and the students were there to BKuhlmanFoundatins-dress1explain their work.  It was a fascinating  event.

Then there were also some interesting things going on in a hall display as well.  The second mini show was of wearable art that was all lazer cut polor fleece.BA28Lazewr-cut-polar-fleeceBA28Lazewr-cutting-laceBA28More-lazercut-fleece   Valerie Goodwin my teacher at QBL had talked about this process in my class and I was delighted to see a second example of the process.

Elsie's-rock-clProgress Report:  Elsie’s Stone     I  am still working away on this Foundations piece.  I am  having a good time working with the close values in this stone  as well as playing with the strong textures.   Once I heard that one should make art to be seen on two levels- from a distance and then drawing the viewer in to take a second look.  I think this series does a good job doing just that.

 Necklace# 7    I still seem to flower-necklace-7find the necklace process that Noel started in me a few month ago working for me.  I think I am nearing the end of the necklace  obsession though.  I think I may apply this idea to a quilt top in the furture.  I  do have two necklaces that are started so I will finish then an then go forward with that idea.


NEW-WORKNew Work    I pulled out fabrics that I though I might use in a new project starting with one of the silks( the orange, white and black print)  that I had purchased from Ginny last week.    I think I will add some more browns to the mix and then begin to build the work.

BA28Daily's-2 Daily News  This project was at a stand still until the velcro arrived.  It is moving forward now and although I only seem to get five blocks done a day I am making progress.BA25Daily's1daily5Daily's

I hope all enjoy the  Labor Day holiday week end in their own fashion.

Keep CreatingDaily-3

Carol

Sharing August 21, 2014

Good Habits  21" 32"
Good Habits
21″ 32″

Hello,

As fall approaches I feel the need to “tidy the nest”  a bit.  As a result of that feeling, I have been sorting out old works and finding new homes for them.      So I took along this quilt when I went to the Dentist and it is now hanging in his office.  It took a min. before he saw the tooth brushes.   He was delighted and so was I as the work was only setting in a dark closet before and I think art should be out in the world.     I feel so fortunate that I can share in this fashion.

This week the FAB group BA21Nancy-Komonawent on a field trip too.    We visited the home studio of Ginny Spina  to see her silk /Komona collection.   It was wonderful.    Her home is beautiful and so are her gardens.    She sells on etsy at  www.silkhouse.etsy.com.    We got to see and handle the silk.  Nancy even tried on one of the Kimono’s that had arrived in the mail that morning.    Victoria and I  both purchased some of her scarps and now I have a new pile of fabrics and the  ideas are flowing.  Nancy purchased on of Ginny’s scarves BA21-Nancy-+-scarfand her custom designed pins that day as well.     We all had lots of fun and made new connections.silks


Progress Report: Ju Ju June

Ju Ju June  !8" X 30"  $190.oo
Ju Ju June
!8″ X 30″
$190.00

  As I predicted this quilt is now complete.   There is lots of experimentation in this piece.  This is my first attempt at using only canvas as the fabric base.  I also had full control of the colors and patters on that base and although I really enjoyed that aspect I do not feel like I explored it fully.  So I need to keep putting myself in that position and dealing with that challenge.   I also feel I need to do a similar project  again because the process is still very much a mimic of Katie Pasquini’s process.    I did enjoy mixing the metal with the gathered ribbon “flower” shapes and the beads.     BA21JuJuJune-cl1


 Rafter Room This quilt is now hanging overRafter-Room  the door to the rafter room were it will remain for it’s life time.   Because it is summer I am not aware of how many drafts it is stopping, but I imagine it will do the job in the fall and winter.    I really enjoyed  doing the free motion work on this project.     It was not only fun to trace the Rafter-Room-cl2shapes printed on the mud cloth it was fun to extend them out into the blank areas.   Then I went forward  to drawing and filling in the blank areas as well. Rafter-Room-cl1  I think  that I will look at pattern with a little bit of a different eye- and notice more details as a result of this  project.

I got to use up the end of one of the fabrics that I had created in Judy Langele’s class at QBL 2  three years ago too.( It is the bottom of this work with the blue gears and dark violet in it)


the road less-traveledThe Road Less Traveled    I am still doing the free motion work on this piece.   I am  trying to sort of soften the hard seam lines with the machine work.   I will add hand work as well.


Foundations XXI- Elise’s Rock/rock A Cape Cod Stone   This is a rock that  Elsie Dents gave me.   She has moved to Pennsylvania and we will miss her strong graphic bird based  work in the DIVA group.  She was cleaning and found this stone that she had collected on the beach at Cape  Cod and BA21Elsies-rock-qthought of me.  So she brought to me at the last meeting that she attended.  I like the strong lines across the  stained quarts  so I am using it as  my jumping off point for the next Foundations work.  I am still working with the out side shape of this quilt part as well as the light and dark on the surface.

Daily News  daily8 BA7daily-10 BA7ddaily9 The news goes on and on.  I am enjoying the playing part of the process now.  I thank Barb every time I finish a block because her way of completing the process is so much faster than mine.

Keep Creating

Carol

Back in the Studio May 29, 2014

 Foundations XIX -Mossy Stone  33" X 29"  $340.00
Foundations XIX -Mossy Stone
33″ X 29″
$340.00

Hello

It is good to be home and after I recovered from my jet lag I enjoyed getting back into the studio and working.    I think having something partly finished helped me get started too.   So I will jump into the Progress Report.

Progress Report: Foundations XIX Mossy Stone   As this image shows I am now done with this quilt.      I am not sure about Mossy Stone-cl2how to declare the size, but have settled on measuring the distance at the longest points to  come up with the numbers.   This quilt  has a very large number of fabrics in it as well as threads, yarns  and some silk paper.   I enjoy the extensive thread work that finishing the quilts in this series requires.   The thread patterns create nice direction and flow directions  to Mossy-stone-cl3my eye  and when I get to that step it is almost meditative in nature when I am working away at it.    I do not see the end of this series any time soon- it is just too much fun to see how many fabrics I can use and how many textures I can include in the process.


Growing in the Dark – Paper Quilt  

Growing in the Dark  Paper Quilt 16" X 21"
Growing in the Dark
Paper Quilt
16″ X 21″


I took a  day workshop in  using the Gelli plate on the weekend before I went off to Paris.  I  made a lot of  wonderful paper and fabric printed images.  I decided to challenge myself and use some of them to do paper quilts again.  I have not done that style growing in the dark -cl2in over two years so it was a bit of a challenge just to recall the process.   The Gelli Plate process is full of chance and I really like that aspect of  using them.  Paper is in the bottom section of this shot   and fabric in the top- they do take the paint /ink differently , but I like them both.    This work because of the nature of the stiffness of the paper Growing-in-the-dark-cl1requires  that one work smaller.  I can only roll so much under the machine arm.  The paper  also is a much flatter material  so it goes together much more quickly .  I added in some of the silk paper as you can see here and it works well with the  other materials.  I have pulled another pile of paper and fabric from the workshop to start another soon.


three-trees


 Three Trees   This work is coming along.  I made the base of the trees on wash away with a dark gray green  wool and then added black yarn on top with machine stitching.  I then trimmed the  away as much of the wash away as I could before I submerged them in  back-of-3-treeshot water.  When they were dry I arranged the trees on the surface and sewed them down.   I loaded my bobbin with brown embroidery thread and the top of my machine with black.   I turned the quilt over and did free motion drawing of smaller branches in the trees using the outlines of applying the trees to the top as my three-trees close up 2guide.    This shot of the back of the quilt helps show what I did.    This closeup shows all three processes.  The dark green is the wool, the black is the  yarn and the brown is the thread.  This project  proved to be a very good way to get back into the free motion process for me.


AsuriteFoundations XX- Asurite  This is my new inspiration stone for the new work in the series.   The first step is to cut the bucrum in the shape of the stone.  Then I  start pinning the background  fabrics to the surface.  Asuritestart   I did the light area first this time and used two different blues and some hand dyed that had blue, white and gray in Pileit.  I then pulled  a pile of blue fabrics that I thought could work and piled them on the floor below the BM29Pinned-Asuritepinwall.  Having them at my feet meant I could pin look down and cut the next piece I wanted with ease.   I continued building on the surface until I had the whole color areas built  in.    The next step was to begin to Asurite close upstitch and pin more into the work and start to build the surface.  I like to work in this free form way and let the process guide me along.  It does mean that I stop and pin the work up frequently and look at the work, but I like that step  as well.


Spring Iris BM29-Spring-Iriscl1 Spring Iris   I am doing the free motion outline step of this work now.    I was so happy to see the Iris in Monet’s garden and I took a lot of photos.  I think I will try to add a  bit of applique on top with the photos in mind.   I am not sure how I will do this yet- but I am thinking on the process.


Red Canvas   red-canvus I started the painting process of this work in the fall as a play day with Cheri.     Seeing the great way she used what we started that day at the Diva Meeting  in March got me to pull the canvases I had created out again.  I cut them up and then zig zagged them back to create a bigger unit.  I then painted on top again to add more depth.  I was still not happy.  So I have now done some hand work and I think I am nearing completion.  I added beads, buttons and some altered metal to the  red canvas close upsurface.   I need some assistance as to how to finish this work  so I will take it to the Diva meeting and get some help.


Daily's Daily’s     I think I am done with this series as far as making the little units is concerned.  I have eight more and that will complete the thirty blocks I have with the two triangles on them.   I have done this daily work for eight months and feel I am ready to find and ending place and move on.  I will take this week as I finish the blocks to decide on a way to complete the project and to think about a new daily or weekly challenge.

Keep Creating

Carol